29 posts tagged with "cloud security"

View All Tags

· 3 min read
info

stackql is a dev tool that allows you to query, manage, and perform analytics against cloud and SaaS resources in real time using SQL, which developers and analysts can use for CSPM, assurance, user access management reporting, IaC, XOps and more.

We are pleased to announce the addition of support for OUTER JOIN operations in StackQL queries. This is a significant addition to the language, and we are excited to see what our users will do with it!

info

An OUTER JOIN is a type of JOIN operation that returns all records from one table (or StackQL resource) and only those records from a second table or resource where the joined fields are equal (i.e. the JOIN condition is met). If there is no match, the missing side of the JOIN is filled with NULL values.

OUTER JOIN operations are important because they allow you to combine data from two or more resources (within a StackQL provider or across StackQL providers), even when there is no match between the two resources. This is a common scenario when performing analytics and reporting on user access management (for example between an IdP (like Okta) and a resource provider like AWS or Google).

Using OUTER JOIN operations in StackQL

If you wanted to find all users in your AWS account that have not logged in to their account in the last 20 days, and compare that to the same information for users in your Google Workspace account, you could use an OUTER JOIN operation to do this. The following query:

select 
aws_users.UserName as aws_user_name
,aws_users.PasswordLastUsed as aws_last_Login_time
,CASE
WHEN aws_users.PasswordLastUsed = '' then 'false'
WHEN ( strftime('%Y-%m-%d %H:%M:%SZ', aws_users.PasswordLastUsed) > ( datetime('now', '-20 days' ) ) ) then 'true'
else 'false' end as aws_is_active
,json_extract(google_users.name, '$.fullName') as google_user_name
,google_users.lastLoginTime as google_last_Login_time
,CASE
WHEN google_users.lastLoginTime is null then 'false'
WHEN google_users.lastLoginTime = '' then 'false'
WHEN ( strftime('%Y-%m-%d %H:%M:%SZ', google_users.lastLoginTime) > ( datetime('now', '-20 days' ) ) ) then 'true'
else 'false' end as google_is_active
from
aws.iam.users aws_users
LEFT OUTER JOIN
googleadmin.directory.users google_users
ON lower(substr(aws_users.UserName, 1, 5)) = lower(substr(json_extract(google_users.name, '$.fullName'), 1, 5))
WHERE aws_users.region = 'us-east-1' AND google_users.domain = 'stackql.io'
;

would produce a result like this:

|------------------------|----------------------|---------------|------------------|--------------------------|------------------|
| aws_user_name | aws_last_Login_time | aws_is_active | google_user_name | google_last_Login_time | google_is_active |
|------------------------|----------------------|---------------|------------------|--------------------------|------------------|
| demo-stackql-cicd-user | null | false | null | null | false |
|------------------------|----------------------|---------------|------------------|--------------------------|------------------|
| github_actions | null | false | null | null | false |
|------------------------|----------------------|---------------|------------------|--------------------------|------------------|
| jeffrey.aven | 2023-06-30T04:29:14Z | true | null | null | false |
|------------------------|----------------------|---------------|------------------|--------------------------|------------------|
| kieran.rimmer | 2023-06-03T08:40:49Z | false | Kieran Rimmer | 2023-06-23T06:01:46.000Z | true |
|------------------------|----------------------|---------------|------------------|--------------------------|------------------|
| ... | ... | ... | ... | ... | ... |
|------------------------|----------------------|---------------|------------------|--------------------------|------------------|

Currently only LEFT OUTER JOIN sppport is available, but we will be adding support for RIGHT OUTER JOIN and FULL OUTER JOIN in the near future. Stay tuned!
· 4 min read
info

stackql is a dev tool that allows you to query and manage cloud and SaaS resources using SQL, which developers and analysts can use for CSPM, assurance, user access management reporting, IaC, XOps and more.

This quick start guide outlines how to create a superset + stackql dashboard on your laptop using docker desktop, helm, and kubernetes. We certainly do not want to go into depth on superset, a third-party application, so this guide is terse.

Supplying secrets

In this example, we use:

All of the associated principals must be granted access using provider-specific access controls.

NOTE keep all of these values secret and certainly do not commit into source control. We have supplied examples for numerous providers, and we suggest that you configure only what you need.

Create a file helm/stackql-dashboards/secrets/secret-values.yaml, containing the following, replacing placeholders:

stackql:
extraSecretEnv:
AWS_ACCESS_KEY_ID: '<your aws access key id>'
AWS_SECRET_ACCESS_KEY: '<your aws secret key>'
AZURE_CLIENT_ID: '<your azure client id>'
AZURE_CLIENT_SECRET: '<your azure client secret>'
AZURE_TENANT_ID: '<your azure tenant id>'
DIGITALOCEAN_TOKEN: '<your digitalocean token>'
STACKQL_GITHUB_TOKEN: '<your github personal access token>'
GOOGLE_APPLICATION_CREDENTIALS: '/opt/stackql/config/google-credentials.json'
extraSecrets:
google-credentials.json: |
<full google json key>

superset:
init:
adminUser:
password: 'mypassword'

Expand templates and deploy locally

Here we will set up and expose a local dashboard using the local kubernetes cluster supplied with docker desktop.

These steps assume that your kubectl config is pointed at your local cluster (depending on your version of docker, something like kubectl config use-context docker-desktop should do the trick) and that you execute from the root directory of the stackql-cloud repository. We will let the system dynamically assign a local port.

helm dependency update  helm/stackql-dashboards

helm template --release-name v1 --namespace default --set superset.service.type=NodePort --set superset.service.nodePort.http="" -f helm/stackql-dashboards/secrets/secret-values.yaml helm/stackql-dashboards > helm/stackql-dashboards/out/stackql-demo-dashboards.yaml

kubectl apply -f helm/stackql-dashboards/out/stackql-demo-dashboards.yaml

Log into and set up superset

Allow a minute or so for init actions to complete.

First, inspect the output of kubectl get svc and note the host port for the service v1-superset. In my case, I see (redacted):

$ kubectl get svc | grep NodePort      
v1-superset NodePort ... ... 8088:31930/TCP ...

So, my local port is 31390 on this occasion. Hereafter let us refer to this port as <SUPERSET_LOCAL_PORT>.

Go to your browser address bar and punch in http://localhost:<SUPERSET_LOCAL_PORT>. Log in using admin / mypassword (or other if you reconfigured), and then you can begin using superset.

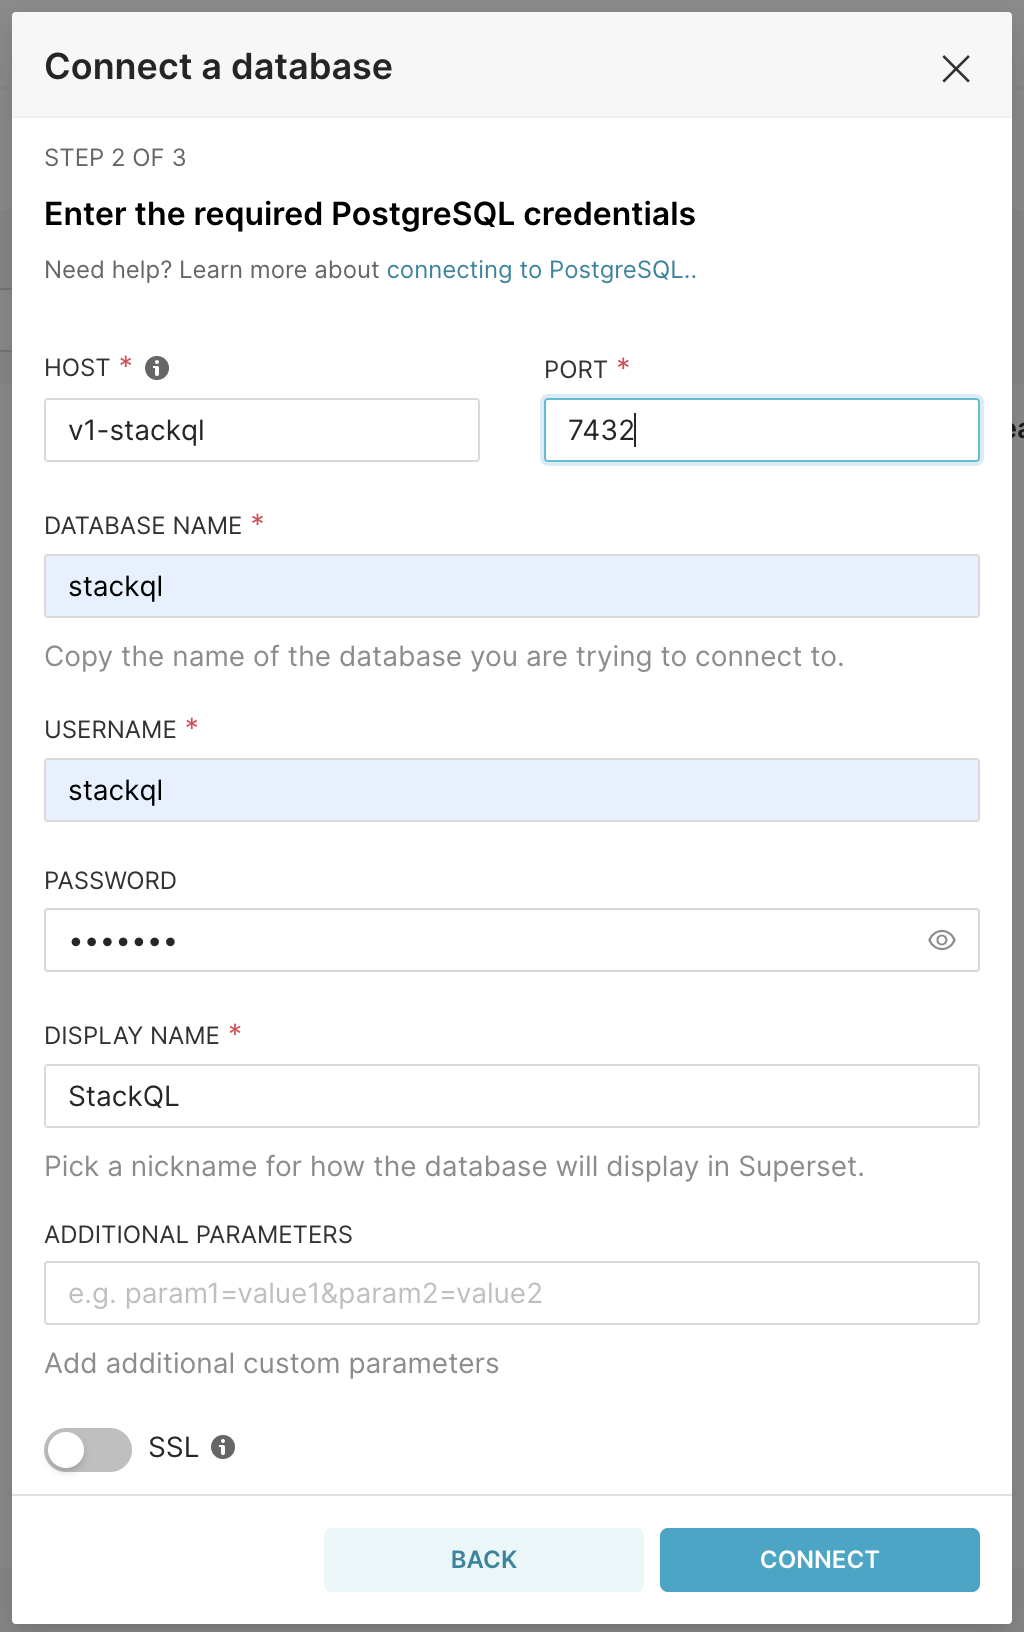
From the top RHS Settings dropdown, select Database Connections. Then, select the + DATABASE button (just below Settings) and do the following (the password does not matter in this context, add anything you want):

Initial database settings

Press "CONNECT"

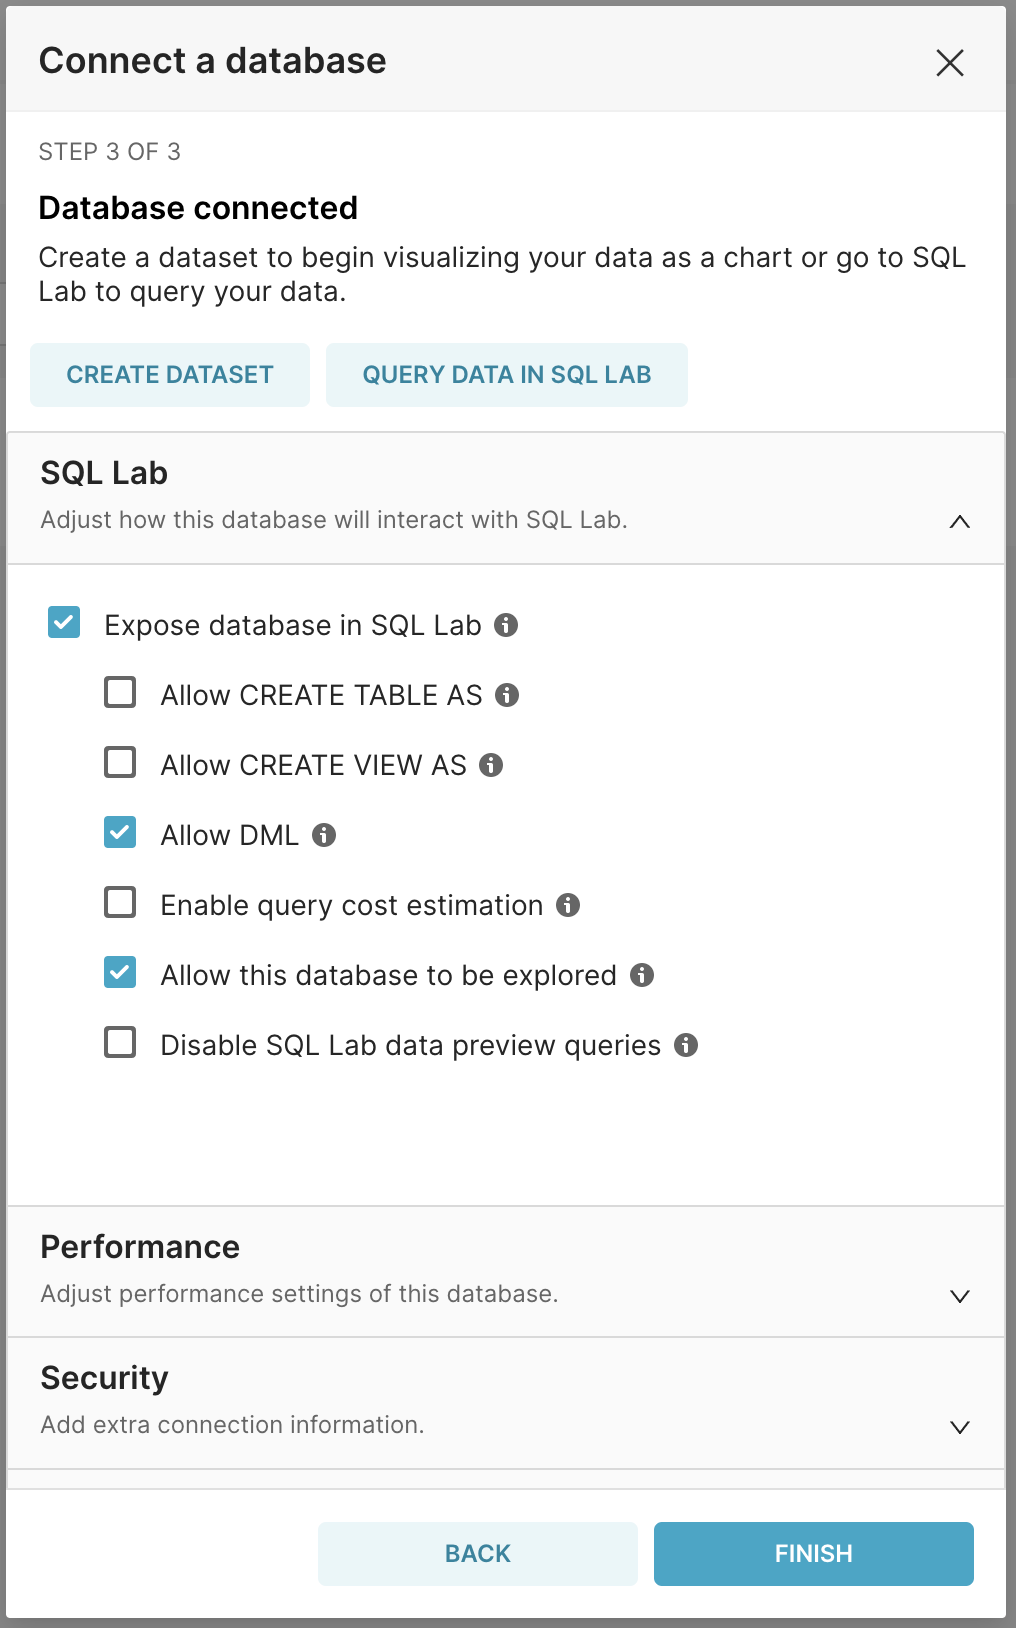
Follow up database settings

Press "FINISH"

NOTE: we have enabled DML here so that meta queries like show and describe will work. You certainly do not have to do this if you don't want to.

Experiment

Here we present a simple GCP scenario; you can follow the same pattern to create many charts and populate a dashboard...

Navigate to SQL > SQL Lab and then input the below, substituting <your gcp project> for whatever google project your service account can access:

select name, guestCpus from google.compute.machine_types where project = '<your gcp project>' and zone = 'australia-southeast1-a';

Press "RUN SELECTION"

A table of results should appear.

Press "Save" > "Save Dataset"

Give it whatever name you want.

You can click the option to create a chart immediately or navigate to your chart via the Charts menu item.

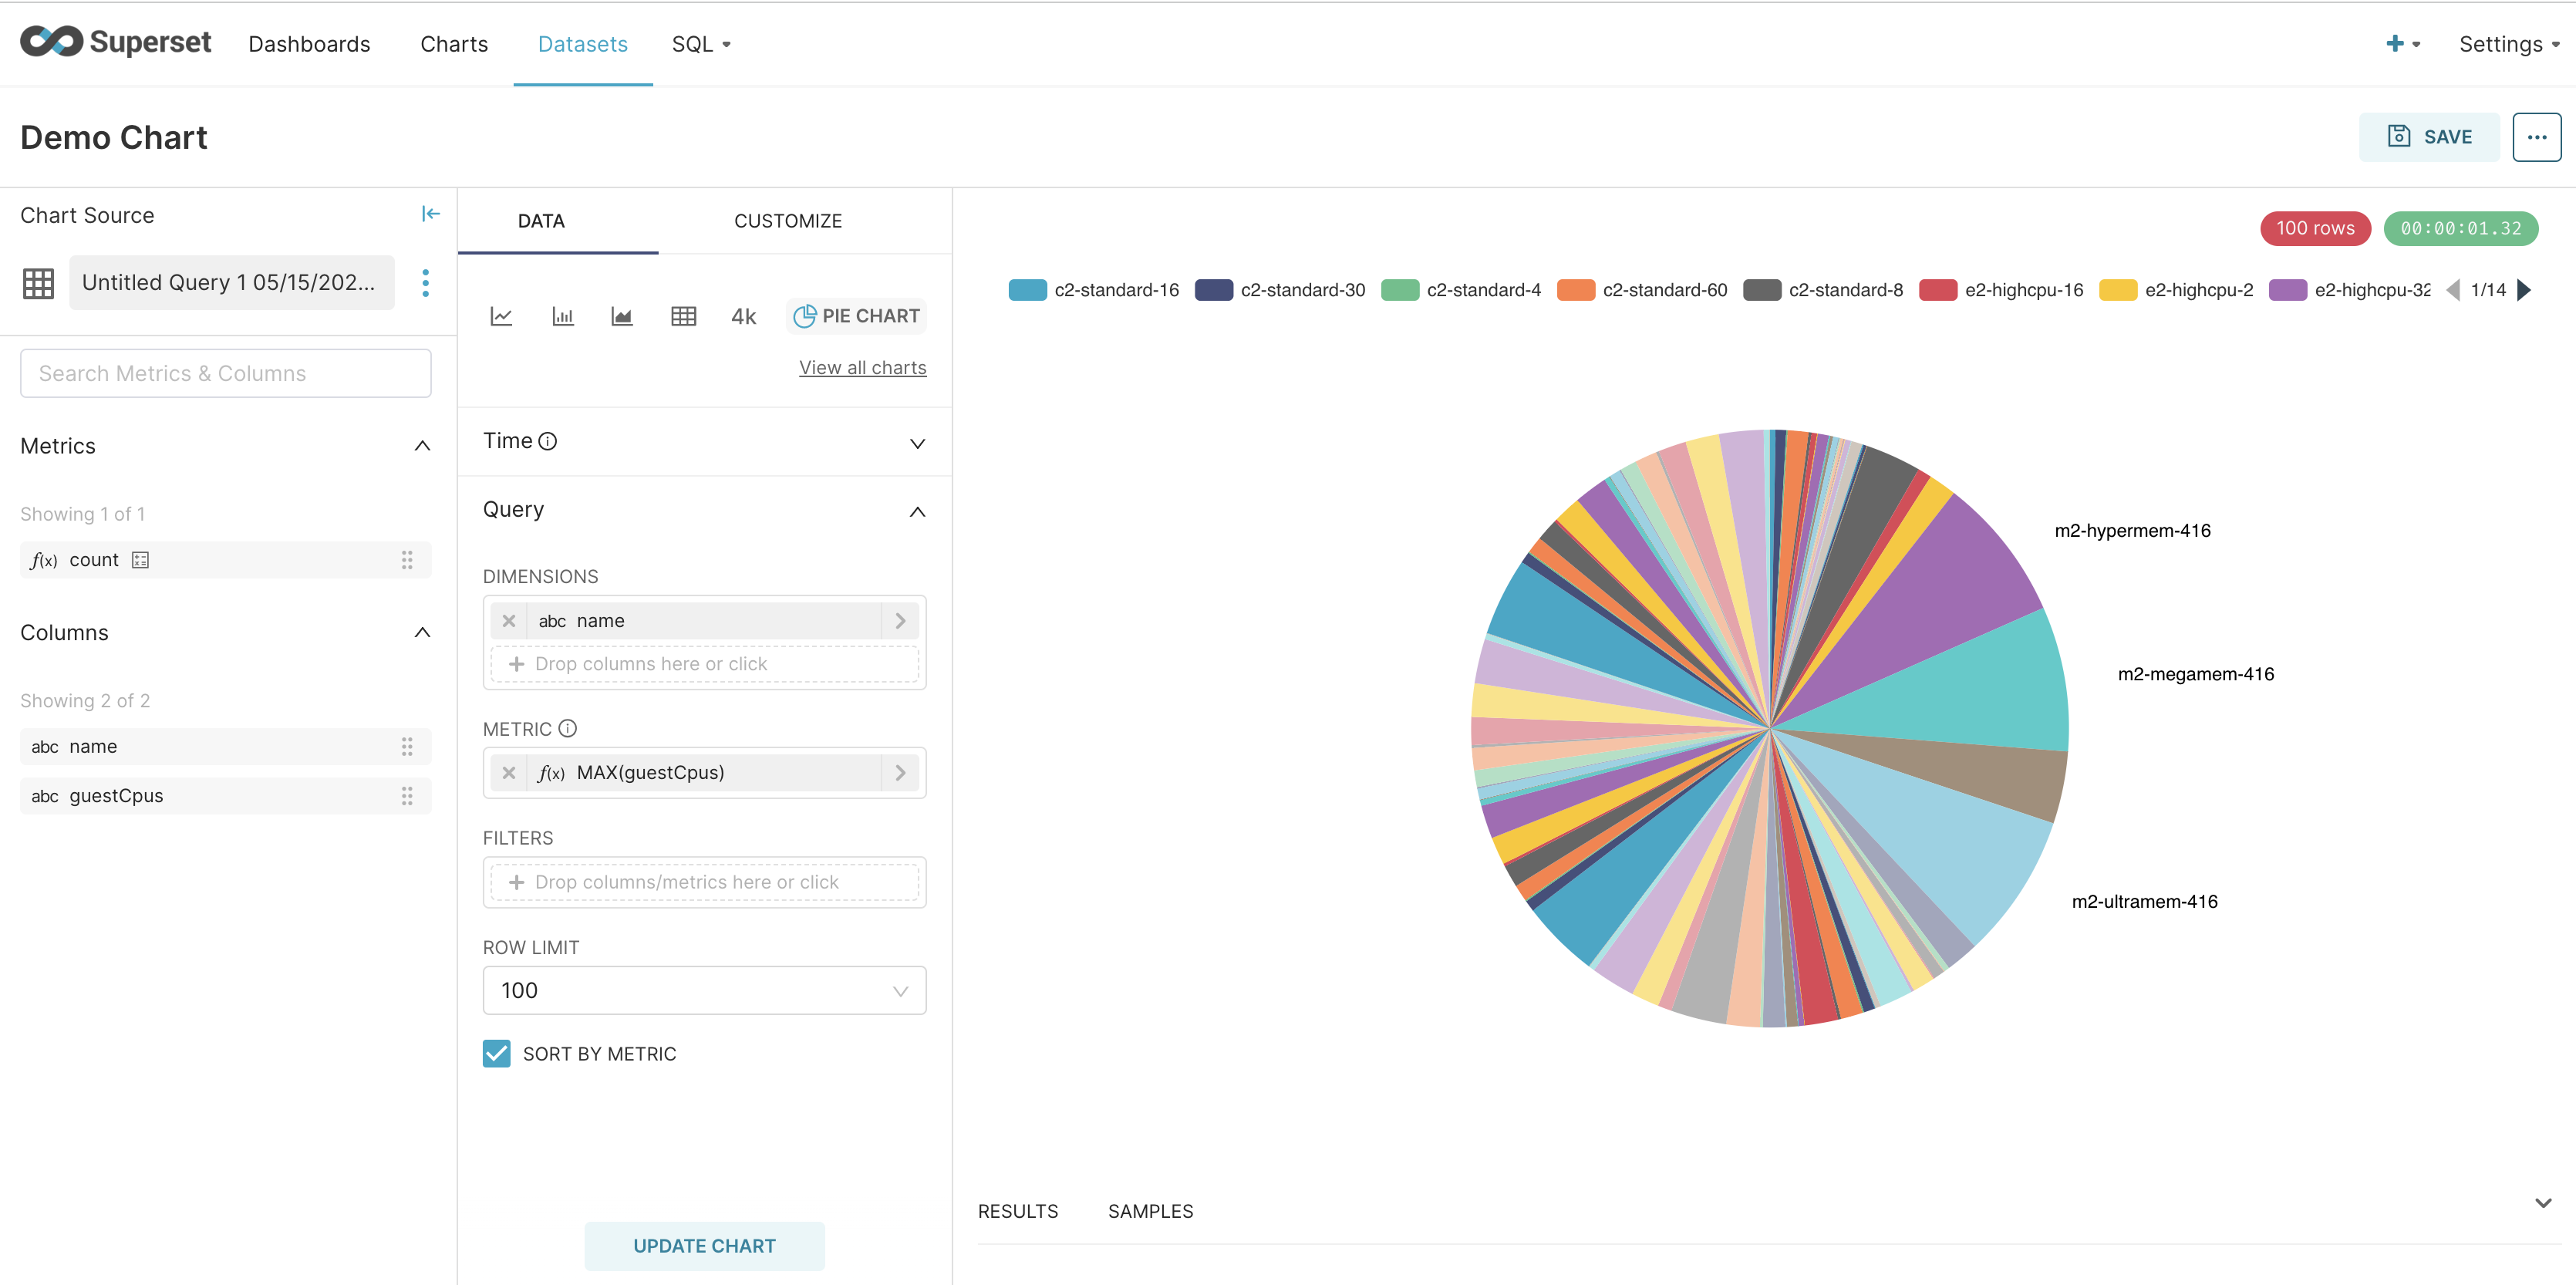
Once inside the UI for your new dataset, do something like this (we will leave it to your creativity)...

My First Chart

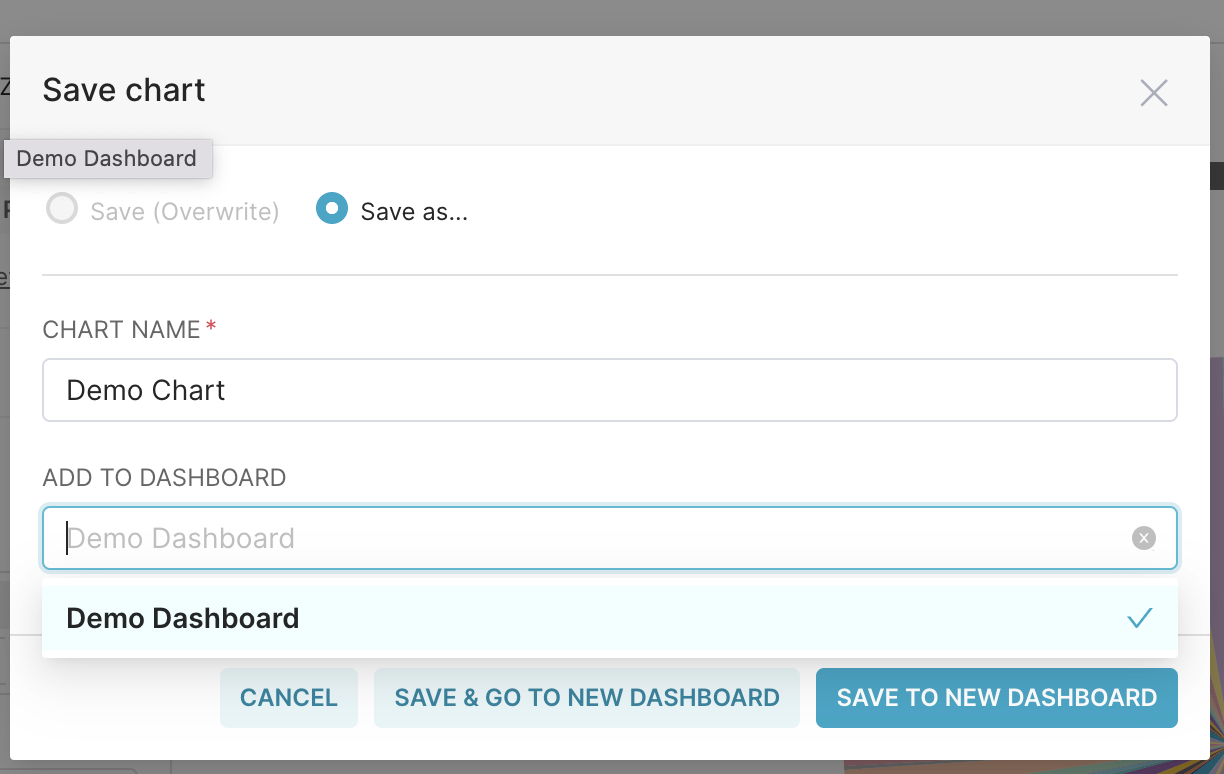
...and then...

Chart To Dashboard

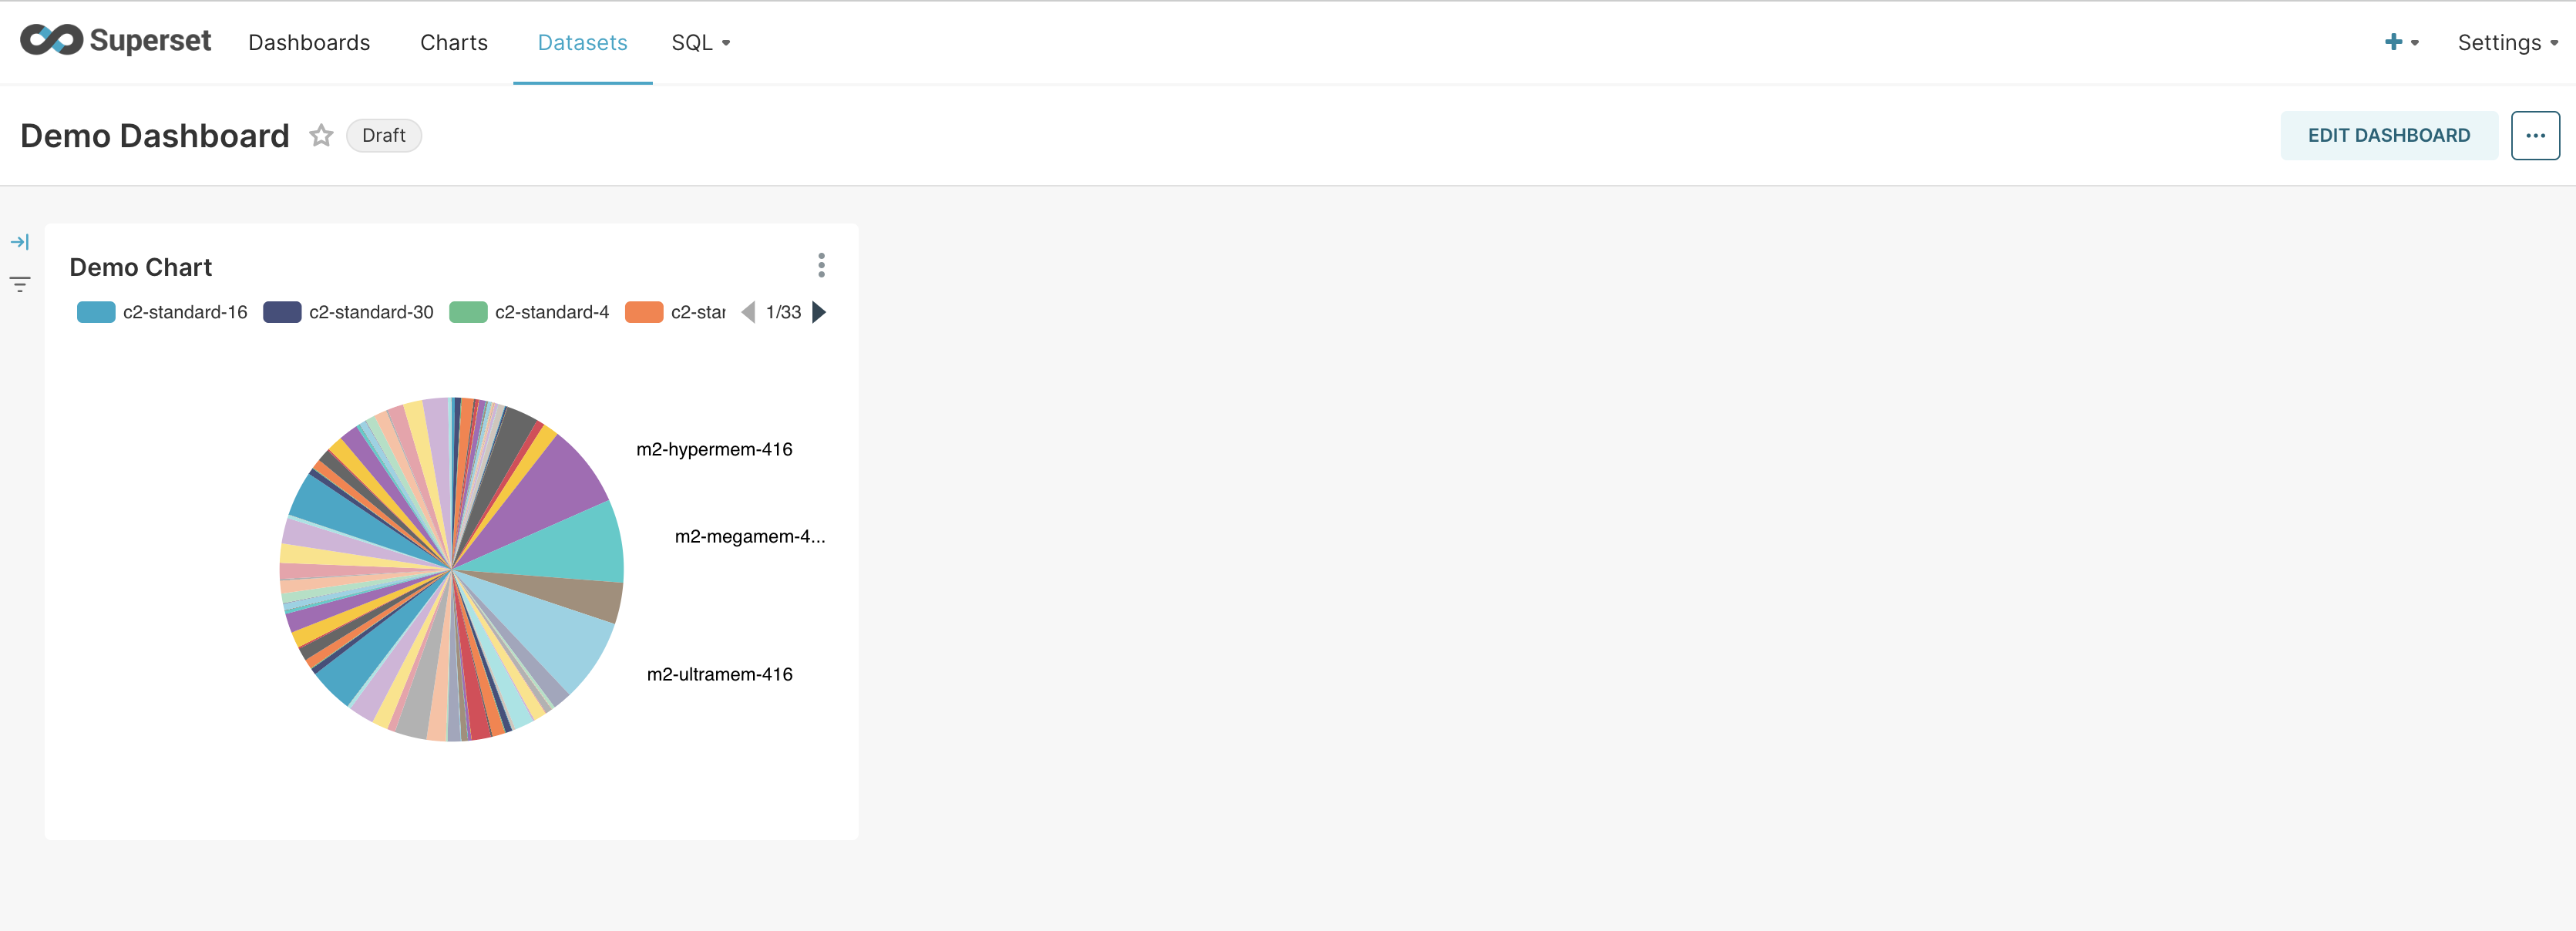
Click on "SAVE & GO TO NEW DASHBOARD", and you have your first dashboard + stackql!

Dashboard

· 2 min read
info

stackql is a dev tool that allows you to query and manage cloud and SaaS resources using SQL, which developers and analysts can use for CSPM, assurance, user access management reporting, IaC, XOps and more.

The StackQL Linode provider is now available. Using the StackQL Linode provider you can create, query, and manage Linodes (instances), Volumes, NodeBalancers, Firewalls, StackScripts, Databases, Kubernetes Clusters, Object Storage Buckets, and much more.

You can use the StackQL Linode provider with other StackQL providers (such as aws, google, azure, digitalocean, and more) to perform multi-cloud CSPM, inventory queries, or multi-provider stack deployments. Documentation for the Linode provider is available at StackQL Linode provider docs.

Here is an example of creating a Linode (a VM instance), passing variables from a jsonnet config file as well as CI secrets (GitHub Actions Secrets, GitLab CI Secrets, etc.):

INSERT INTO linode.instances.linodes(
data__authorized_keys,
data__authorized_users,
data__root_pass,
data__image,
data__label,
data__region,
data__type
)
SELECT
'[ "{{ .authorized_key }}" ]',
'[ "{{ .authorized_user }}" ]',
'{{ .root_pass }}',
'{{ .image }}',
'{{ .label }}',
'{{ .region }}',
'{{ .type }}'
;

Querying objects in Linode can be done using SELECT statements, such as:

select id, 
label,
region,
JSON_EXTRACT(specs, '$.vcpus') as vcpus,
JSON_EXTRACT(specs, '$.memory') as memory,
JSON_EXTRACT(specs, '$.disk') as disk,
status
from linode.instances.linodes;

Which would return:

|----------|-----------|--------------|-------|--------|-------|---------|                                                                                                                                              
| id | label | region | vcpus | memory | disk | status |
|----------|-----------|--------------|-------|--------|-------|---------|
| 46063573 | my-linode | ap-southeast | 1 | 1024 | 25600 | running |
|----------|-----------|--------------|-------|--------|-------|---------|

Summary or aggregate queries such as GROUP BY -> COUNT or SUM are fully supported with StackQL, as are JOIN and UNION operations (including cross-provider JOIN operations).

StackQL supported outputs include table, csv (using a comma or user-specified delimiter), and json.

StackQL can be accessed through the interactive shell stackql shell as well as noninteractive access using stackql exec and server-based access using stackql srv - where you can use any Postgres wire protocol client to run StackQL queries. GitHub actions, Jupyter notebooks, and Superset dashboards are other options for using StackQL.

· 3 min read
info

stackql is a dev tool that allows you to query and manage cloud and SaaS resources using SQL, which developers and analysts can use for CSPM, assurance, user access management reporting, IaC, XOps and more.

The Digital Ocean provider is now available for StackQL. You can use StackQL to provision, manage or report on Droplets, Apps, Functions, Databases, Volumes, Spaces, and more.

To use the Digital Ocean provider, generate a Personal Access Token from the Digital Ocean Control Panel under the API section. Export the value of the token created to a variable named DIGITALOCEAN_TOKEN (on your local system or as a CI secret). You can then run queries against the Digital Ocean provider using StackQL.

The following example demonstrates the creation of a Droplet in Digital Ocean.

INSERT INTO digitalocean.droplets.droplets ( 
data__name,
data__region,
data__size,
data__image,
data__backups,
data__ipv6,
data__monitoring,
data__tags
)
SELECT
'droplet-1.example.com',
'nyc3',
's-1vcpu-1gb',
'ubuntu-20-04-x64',
true,
true,
true,
'["env:prod", "web"]';

You can use jsonnet as a configuration, templating language with StackQL to provide variables or parameters to IaC operations in StackQL; this can be done using the --data flag in the stackql exec command as follows:

./stackql exec --infile create_droplets.iql --iqldata vars.jsonnet

The code for create_droplets.iql and vars.jsonnet is shown here:

{{range $index, $element := .droplets}}
INSERT INTO digitalocean.droplets.droplets (
data__name,
data__region,
data__size,
data__image,
data__backups,
data__ipv6,
data__monitoring,
data__tags
)
SELECT
'droplet-{{$index}}.stackql.io',
'nyc3',
'{{.size}}',
'ubuntu-20-04-x64',
true,
true,
true,
'["env:prod", "web"]';
{{end}}

StackQL is a unified SQL-based framework that can be used for analytics and reporting as well as provisioning, de-provisioning, and lifecycle opertaions. As a native multi-cloud solution, StackQL can analyze and report across assets across multiple different providers; an example is shown here:

SELECT 
name,
JSON_EXTRACT(region, '$.name') as region,
JSON_EXTRACT(size, '$.slug') as size,
'digitalocean' as provider
FROM digitalocean.droplets.droplets
UNION
SELECT
instanceId as name,
'us-east-1' as region,
instanceType as size,
'aws' as provider
FROM aws.ec2.instances
WHERE region = 'us-east-1';

Digital Ocean and multi-cloud queries can be visualized using BI tools or notebooks; examples of using StackQL with Jupyter can be found here.

More information about the Digital Ocean provider for StackQL can be found here.

· 2 min read
info

stackql is a dev tool that allows you to query and manage cloud and SaaS resources using SQL, which developers and analysts can use for CSPM, assurance, user access management reporting, IaC, XOps and more.

For more background on using StackQL with GitHub Actions see StackQL GitHub Actions Tutorial

- name: setup StackQL
uses: stackql/setup-stackql@v1.1.0
with:
use_wrapper: true

- name: get changed files
env:
STACKQL_GITHUB_USERNAME: ${{ secrets.STACKQL_GITHUB_USERNAME }}
STACKQL_GITHUB_PASSWORD: ${{ secrets.STACKQL_GITHUB_PASSWORD }}
shell: bash
run: |
ORG=$(echo "$GITHUB_REPOSITORY" | cut -d '/' -f1)
REPO=$(echo "$GITHUB_REPOSITORY" | cut -d '/' -f2)
QUERY="select filename FROM github.repos.commit_files where owner = '${ORG}' and ref = '${GITHUB_SHA}' and repo = '${REPO}'"
echo "pulling github provider"
stackql exec "REGISTRY PULL github"
echo "running query: ${QUERY}"
stackql --output json -f changed_files.txt exec "${QUERY}"

changed_files.txt looks like this...

[{"filename":"src/app.ts"},{"filename":"src/mod.ts"},...]

You could then do something with the changed files in a further step like:

- name: Do something with changed files
run: |
while IFS="" read -r filename || [ -n "$filename" ]
do
echo "processing ${filename}..."
#
# do something interesting here...
#
done < <(jq -r '.[] | .filename' changed_files.txt)

The github.repos.commit_files StackQL resource has other interesting fields which could be projected and used for actioning or reporting, these can be seen using:

DESCRIBE EXTENDED github.repos.commit_files;

Fields available in this resource include:

  • status - one of added, removed, modified, renamed, copied, changed or unchanged
  • filename - filename which has changed
  • previous_filename - previous filename if the filename had changed in the commit
  • additions - the number of additions in each file
  • changes - the number of changes to each file
  • deletions - the number of deletions in each file
  • patch - git diff output for each file
  • blob_url - the blob url for the file
  • raw_url - the raw url for the file
  • contents_url - the contents url for the file
  • sha - The sha for each individual file

Read More

Check out a full demo on using StackQL with GitHub Actions

Check the GitHub Repos