
4 posts tagged with "dashboards"

View All Tags

· 2 min read
info

stackql is a dev tool that allows you to query and manage cloud and SaaS resources using SQL, which developers and analysts can use for CSPM, assurance, user access management reporting, IaC, XOps and more.

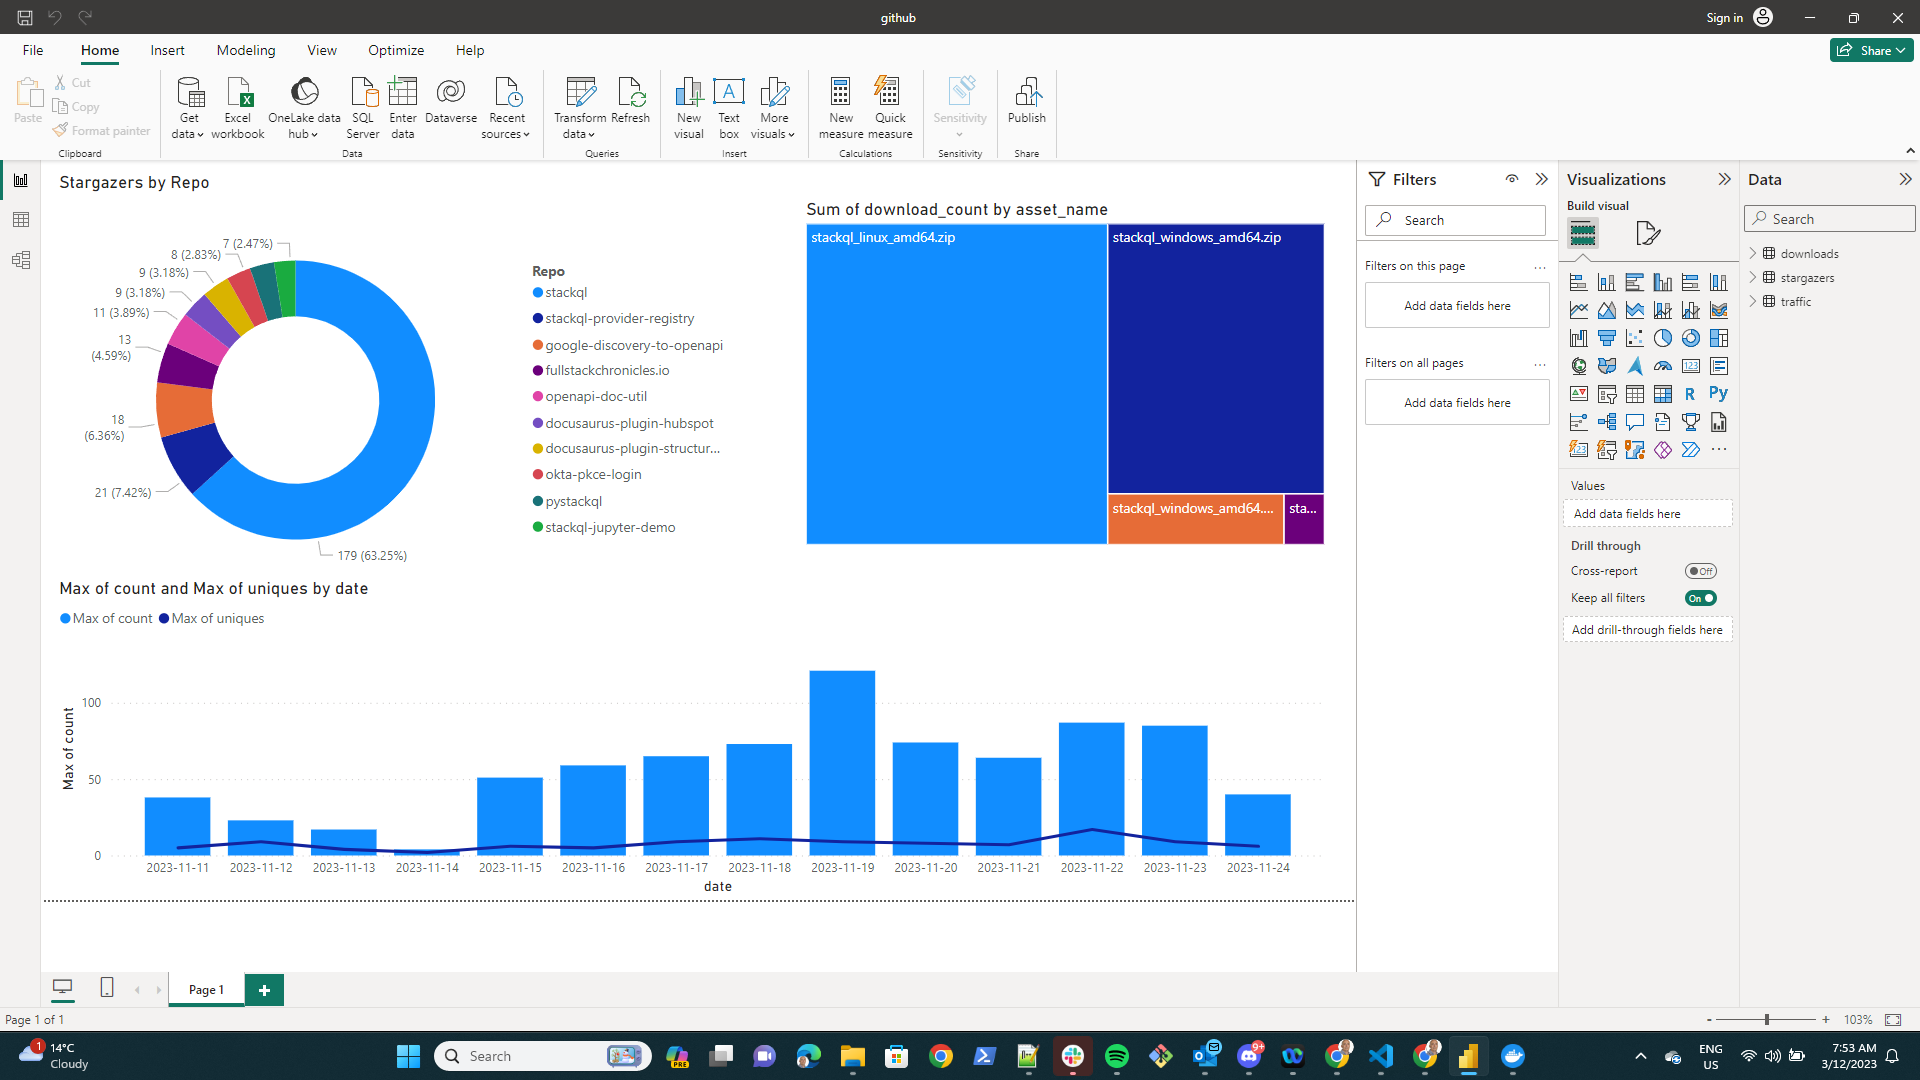
You can leverage the powerful combination of StackQL and PowerBI to create comprehensive dashboard interfaces. These dashboards are perfect for reporting on various aspects such as cloud security, inventory, and configuration.

stackql-powerbi-dashboard

Quick Start Guide

Set Up StackQL Server

To get started, you can run a StackQL server container on port 7432. Use the following project for easy setup: StackQL Server on GitHub.

Create an ODBC Connection

Next, set up an ODBC connection using the PostgreSQL ODBC driver. You can download the latest driver from the PostgreSQL ODBC Driver Versions. Install this driver on your local machine to proceed.

Integrating with PowerBI

Once your ODBC connection is ready, you can move on to PowerBI. Here’s how you can integrate StackQL queries into PowerBI:

  1. Create Data Sources in PowerBI: For each StackQL query that you want to visualize, create a new data source in PowerBI.

  2. Test Queries Locally: Before integrating with PowerBI, you can test your StackQL queries locally using psql. For example:

    $ psql -h localhost -p 7432 -U stackql -d stackql
    psql (14.9 (Ubuntu 14.9-0ubuntu0.22.04.1), server 0.0.0)
    Type "help" for help.

    stackql=> select name, stargazers FROM
    (select name, stargazers_count as stargazers
    from github.repos.repos
    where org = 'stackql'
    and visibility = 'public'
    order by stargazers_count desc) t
    limit 3;
    name | stargazers
    -----------------------------------+------------
    stackql | 179
    stackql-provider-registry | 21
    google-discovery-to-openapi | 18
    (3 rows)
  3. Visualize with PowerBI: With your named data sources created, you can now visualize the result sets in PowerBI. Use various visualization tools like bar charts, pie charts, and line charts to create rich and insightful dashboards.

Let us know your thoughts! Visit us and give us a ⭐ on GitHub

· 3 min read
info

stackql is a dev tool that allows you to query, manage, and perform analytics against cloud and SaaS resources in real time using SQL, which developers and analysts can use for CSPM, assurance, user access management reporting, IaC, XOps and more.

The googleadmin StackQL provider is now available, which allows you to query, provision, or manage Google Workspace users, groups, devices, and more using StackQL. The googleadmin provider can be used with the google provider or other cloud providers to generate entitlements reports (or user access reviews) where Google Workspace identites are used in identity federation or IAM bindings.

The full documentation on how to use a Google service account for authentication to the googleadmin provider is available here. Information about the directory resources available and their fields and methods, is available in the StackQL Provider Registry Docs.

Simple Query

A simple query using the googleadmin provider is shown here:

SELECT
primaryEmail,
lastLoginTime
FROM
googleadmin.directory.users
WHERE domain = 'stackql.io'
AND primaryEmail = 'javen@stackql.io';

which would return the following results...

|------------------|--------------------------|                                                                                                                                                   
| primaryEmail | lastLoginTime |
|------------------|--------------------------|
| javen@stackql.io | 2023-07-08T23:30:31.000Z |
|------------------|--------------------------|

Example Query Using Built-In Functions

Here is an example using built-in functions in StackQL (more information about built-in functions is available in the StackQL docs):

SELECT
primaryEmail,
json_extract(name, '$.fullName') as full_name,
lastLoginTime
FROM
googleadmin.directory.users
WHERE domain = 'stackql.io'
AND primaryEmail = 'javen@stackql.io';

which would return results like this...

|------------------|--------------|--------------------------|                                                                                                                                    
| primaryEmail | full_name | lastLoginTime |
|------------------|--------------|--------------------------|
| javen@stackql.io | Jeffrey Aven | 2023-07-08T23:30:31.000Z |
|------------------|--------------|--------------------------|

Example Query Using Aggregate Functions

Here is an example of a summary query that could be useful:

SELECT
isAdmin,
COUNT(*) as num_admins
FROM
googleadmin.directory.users
WHERE domain = 'stackql.io'
GROUP BY isAdmin

results in...

|---------|------------|                                                                                                                                                                          
| isAdmin | num_admins |
|---------|------------|
| false | 9 |
|---------|------------|
| true | 2 |
|---------|------------|

Entitlements Report Using a LEFT JOIN with the google provider

Using the LEFT OUTER JOIN capability with StackQL, you can generate entitlements or user access management reports that span across Google Workspace as an Identity Provider (IdP) and a Google Cloud resource (including Organizations, Folders, Projects, and resources), such as:

SELECT 
split_part(json_extract(iam.members,'$[0]'), ':', 2) as member,
iam.role as role,
users.lastLoginTime
FROM google.cloudresourcemanager.organizations_iam_bindings iam
LEFT OUTER JOIN googleadmin.directory.users users
ON split_part(json_extract(iam.members,'$[0]'), ':', 2) = users.primaryEmail
WHERE users.domain = 'stackql.io'
AND iam.organizationsId = 141318256085
AND users.primaryEmail = 'javen@stackql.io';

which would return...

|------------------|------------------------------|--------------------------|                                                                                                                    
| member | role | lastLoginTime |
|------------------|------------------------------|--------------------------|
| javen@stackql.io | roles/bigquery.resourceAdmin | 2023-07-08T23:30:31.000Z |
|------------------|------------------------------|--------------------------|
| javen@stackql.io | roles/logging.admin | 2023-07-08T23:30:31.000Z |
|------------------|------------------------------|--------------------------|

Let us know what you think!

· 3 min read
info

stackql is a dev tool that allows you to query, manage, and perform analytics against cloud and SaaS resources in real time using SQL, which developers and analysts can use for CSPM, assurance, user access management reporting, IaC, XOps and more.

We are pleased to announce the addition of support for OUTER JOIN operations in StackQL queries. This is a significant addition to the language, and we are excited to see what our users will do with it!

info

An OUTER JOIN is a type of JOIN operation that returns all records from one table (or StackQL resource) and only those records from a second table or resource where the joined fields are equal (i.e. the JOIN condition is met). If there is no match, the missing side of the JOIN is filled with NULL values.

OUTER JOIN operations are important because they allow you to combine data from two or more resources (within a StackQL provider or across StackQL providers), even when there is no match between the two resources. This is a common scenario when performing analytics and reporting on user access management (for example between an IdP (like Okta) and a resource provider like AWS or Google).

Using OUTER JOIN operations in StackQL

If you wanted to find all users in your AWS account that have not logged in to their account in the last 20 days, and compare that to the same information for users in your Google Workspace account, you could use an OUTER JOIN operation to do this. The following query:

select 
aws_users.UserName as aws_user_name
,aws_users.PasswordLastUsed as aws_last_Login_time
,CASE
WHEN aws_users.PasswordLastUsed = '' then 'false'
WHEN ( strftime('%Y-%m-%d %H:%M:%SZ', aws_users.PasswordLastUsed) > ( datetime('now', '-20 days' ) ) ) then 'true'
else 'false' end as aws_is_active
,json_extract(google_users.name, '$.fullName') as google_user_name
,google_users.lastLoginTime as google_last_Login_time
,CASE
WHEN google_users.lastLoginTime is null then 'false'
WHEN google_users.lastLoginTime = '' then 'false'
WHEN ( strftime('%Y-%m-%d %H:%M:%SZ', google_users.lastLoginTime) > ( datetime('now', '-20 days' ) ) ) then 'true'
else 'false' end as google_is_active
from
aws.iam.users aws_users
LEFT OUTER JOIN
googleadmin.directory.users google_users
ON lower(substr(aws_users.UserName, 1, 5)) = lower(substr(json_extract(google_users.name, '$.fullName'), 1, 5))
WHERE aws_users.region = 'us-east-1' AND google_users.domain = 'stackql.io'
;

would produce a result like this:

|------------------------|----------------------|---------------|------------------|--------------------------|------------------|
| aws_user_name | aws_last_Login_time | aws_is_active | google_user_name | google_last_Login_time | google_is_active |
|------------------------|----------------------|---------------|------------------|--------------------------|------------------|
| demo-stackql-cicd-user | null | false | null | null | false |
|------------------------|----------------------|---------------|------------------|--------------------------|------------------|
| github_actions | null | false | null | null | false |
|------------------------|----------------------|---------------|------------------|--------------------------|------------------|
| jeffrey.aven | 2023-06-30T04:29:14Z | true | null | null | false |
|------------------------|----------------------|---------------|------------------|--------------------------|------------------|
| kieran.rimmer | 2023-06-03T08:40:49Z | false | Kieran Rimmer | 2023-06-23T06:01:46.000Z | true |
|------------------------|----------------------|---------------|------------------|--------------------------|------------------|
| ... | ... | ... | ... | ... | ... |
|------------------------|----------------------|---------------|------------------|--------------------------|------------------|

Currently only LEFT OUTER JOIN sppport is available, but we will be adding support for RIGHT OUTER JOIN and FULL OUTER JOIN in the near future. Stay tuned!

· 4 min read
info

stackql is a dev tool that allows you to query and manage cloud and SaaS resources using SQL, which developers and analysts can use for CSPM, assurance, user access management reporting, IaC, XOps and more.

This quick start guide outlines how to create a superset + stackql dashboard on your laptop using docker desktop, helm, and kubernetes. We certainly do not want to go into depth on superset, a third-party application, so this guide is terse.

Supplying secrets

In this example, we use:

All of the associated principals must be granted access using provider-specific access controls.

NOTE keep all of these values secret and certainly do not commit into source control. We have supplied examples for numerous providers, and we suggest that you configure only what you need.

Create a file helm/stackql-dashboards/secrets/secret-values.yaml, containing the following, replacing placeholders:

stackql:
extraSecretEnv:
AWS_ACCESS_KEY_ID: '<your aws access key id>'
AWS_SECRET_ACCESS_KEY: '<your aws secret key>'
AZURE_CLIENT_ID: '<your azure client id>'
AZURE_CLIENT_SECRET: '<your azure client secret>'
AZURE_TENANT_ID: '<your azure tenant id>'
DIGITALOCEAN_TOKEN: '<your digitalocean token>'
STACKQL_GITHUB_TOKEN: '<your github personal access token>'
GOOGLE_APPLICATION_CREDENTIALS: '/opt/stackql/config/google-credentials.json'
extraSecrets:
google-credentials.json: |
<full google json key>

superset:
init:
adminUser:
password: 'mypassword'

Expand templates and deploy locally

Here we will set up and expose a local dashboard using the local kubernetes cluster supplied with docker desktop.

These steps assume that your kubectl config is pointed at your local cluster (depending on your version of docker, something like kubectl config use-context docker-desktop should do the trick) and that you execute from the root directory of the stackql-cloud repository. We will let the system dynamically assign a local port.

helm dependency update  helm/stackql-dashboards

helm template --release-name v1 --namespace default --set superset.service.type=NodePort --set superset.service.nodePort.http="" -f helm/stackql-dashboards/secrets/secret-values.yaml helm/stackql-dashboards > helm/stackql-dashboards/out/stackql-demo-dashboards.yaml

kubectl apply -f helm/stackql-dashboards/out/stackql-demo-dashboards.yaml

Log into and set up superset

Allow a minute or so for init actions to complete.

First, inspect the output of kubectl get svc and note the host port for the service v1-superset. In my case, I see (redacted):

$ kubectl get svc | grep NodePort      
v1-superset NodePort ... ... 8088:31930/TCP ...

So, my local port is 31390 on this occasion. Hereafter let us refer to this port as <SUPERSET_LOCAL_PORT>.

Go to your browser address bar and punch in http://localhost:<SUPERSET_LOCAL_PORT>. Log in using admin / mypassword (or other if you reconfigured), and then you can begin using superset.

From the top RHS Settings dropdown, select Database Connections. Then, select the + DATABASE button (just below Settings) and do the following (the password does not matter in this context, add anything you want):

Initial database settings

Press "CONNECT"

Follow up database settings

Press "FINISH"

NOTE: we have enabled DML here so that meta queries like show and describe will work. You certainly do not have to do this if you don't want to.

Experiment

Here we present a simple GCP scenario; you can follow the same pattern to create many charts and populate a dashboard...

Navigate to SQL > SQL Lab and then input the below, substituting <your gcp project> for whatever google project your service account can access:

select name, guestCpus from google.compute.machine_types where project = '<your gcp project>' and zone = 'australia-southeast1-a';

Press "RUN SELECTION"

A table of results should appear.

Press "Save" > "Save Dataset"

Give it whatever name you want.

You can click the option to create a chart immediately or navigate to your chart via the Charts menu item.

Once inside the UI for your new dataset, do something like this (we will leave it to your creativity)...

My First Chart

...and then...

Chart To Dashboard

Click on "SAVE & GO TO NEW DASHBOARD", and you have your first dashboard + stackql!

Dashboard